

Can You Edit A Streaming Sources Size By Changing The Url Gadget
Using the rich text editor for content
This folio was printed on Mar 26, 2022. For the current version, visit https://help.shopify.com/en/transmission/shopify-admin/productivity-tools/rich-text-editor.
You lot tin utilise Shopify'due south rich text editor to format and style the text that appears on your online store.
Where to use the rich text editor
Yous can use the rich text editor to add or edit text in several places on your shop:
- Product descriptions
- Collection descriptions
- Blog posts
- Pages
- Shop Policies
If you're using an Online Store 2.0 theme, then yous can add together rich text sections to your pages or templates with the Theme Editor.
Add HTML content with the rich text editor
You tin enter HTML content for your blog posts, pages, product descriptions, and drove descriptions with the rich text editor.
Click the Show HTML push to view the HTML lawmaking for the content inside the rich text editor:

In the HTML view, you can make many changes to the content in the rich text editor. You can add together images, videos, or tables using HTML, and y'all can debug or fine-tune the layout and content style.
Embed a media widget
If you desire to embed a video or music widget, and then you need to kickoff host it on a service like Youtube, Vimeo, or SoundCloud. These services generate an embed lawmaking, which you can copy and paste into your Shopify admin rich text editor.
Steps:
-
Find the embed lawmaking for the media that you lot want to embed.
-
Select the entire embed code by clicking it and pressing
ctrl+Aon a PC orcommand+Aon a Mac. -
Copy the embed code past pressing
ctrl+Con a PC orcommand+Con a Mac. -
In your Shopify admin, click the Evidence HTML button on the rich text editor for the content that yous're editing.
-
Paste the embed code by pressing
ctrl+Von a PC orcontrol+Fiveon a Mac: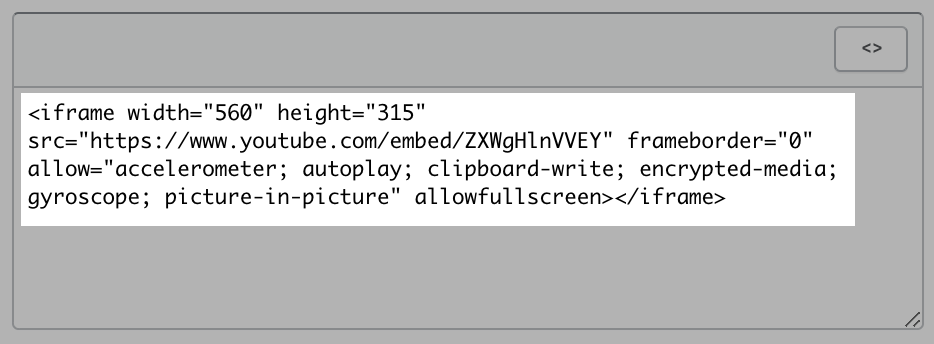
-
Click Save on the page that you're editing to salve your changes.
Format text with the rich text editor
With the Formatting button, you can apace create paragraphs, headings, or blockquotes. Using the right formatting and heading levels helps people and search engines to read your website's content.
To choose a format for text, highlight the text and then click the Formatting button:

Formatting options
-
Paragraph
Nearly text content of your website is paragraph text. Paragraph text usually has a font size of 10–12 pt, simply some themes apply different font sizes.
-
Heading (1-6)
Headings are used to structure content. There are half-dozen heading levels. Heading 1 is the most of import level and Heading half dozen is the least of import.
-
Blockquote
A cake quote is used to show text that is attributed to someone else, like a quotation or an extract from a book or website.
Bold text
To brand text bold, highlight the text and click the Bold button:

Italicize text
To make text italic, highlight the text and click the Italic push:

Underline text
To underline text, highlight the text and click the Underline push button.

Create a bulleted list
To create a bulleted listing, click the Bulleted list button:

You lot can type to create the first bulleted list detail. To create new list items, press the enter or return central. To terminate the list, press the enter or return key twice.
Create a numbered list
To create a numbered listing, click the Numbered list button:

You can type to create the first numbered list items. To create new list items, press the enter or return cardinal. To finish the list, printing the enter or return primal twice.
Indent text
To indent a paragraph, click the Indent push:

Indenting a paragraph gives it a margin on its left side.
Unindent text
To unindent or "outdent" a paragraph, click the Outdent button:

Unindenting a paragraph removes any indented margins that it has.
Align text
To align text, select the text, click the Alignment push button, and choose Left align, Center align, or Right align:

Change text colors with the rich text editor
Steps:
-
Highlight the text and click the Color button.

-
Click a colour or enter a hex lawmaking to change the highlighted text to that color.
Change text background colors
Steps:
-
Highlight the text and click the Color push.
-
Click the Background tab.
-
Click a color or enter a hex code to change the highlighted text's background to that color.
Clear formatting in the rich text editor
To remove formatting from text or images, highlight the content and then click the Clear formatting button:
Insert tables with the rich text editor
You tin insert tables in your blog posts, pages, production descriptions, and collection descriptions with the rich text editor. You can identify text, images, or fifty-fifty videos into a table later you create it.
Steps:
-
In the rich text editor, click the Insert table button:

-
Click Insert table to insert a table. This creates a table with 1 row and one column.
When yous have created a tabular array, click the Insert table button once again to modify the table's rows and columns:
- Insert row above: Place your cursor in a row and click this button to insert a new row in a higher place.
- Insert row beneath: Place your cursor in a row and click this push button to insert a new row below.
- Insert column before: Place your cursor in a column and click this button to insert a new cavalcade before that column.
- Insert cavalcade later on: Identify your cursor in a cavalcade and click this push button to insert a new column after that cavalcade.
- Delete row: Place your cursor in a row that you lot want to delete and then click this push.
- Delete column: Place your cursor in a column that you desire to delete and then click this button.
- Delete table: Place your cursor anywhere in the table and then click this button to delete the unabridged table.
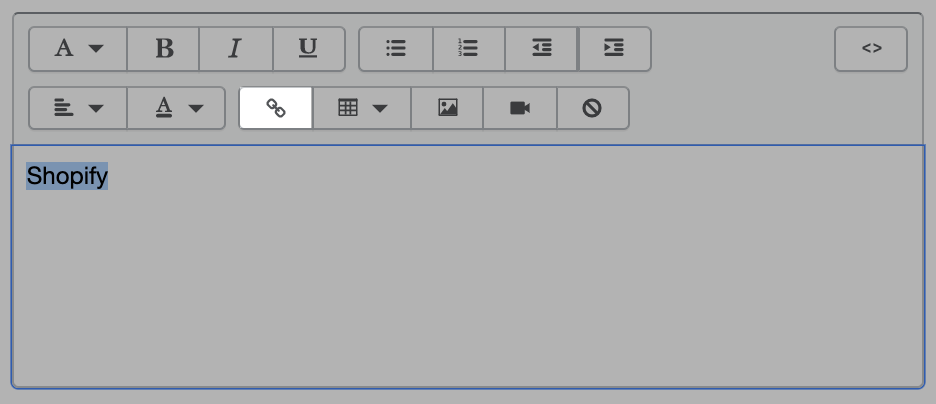
Insert links with the rich text editor
You can insert links (hyperlinks) in blog posts, pages, product descriptions, and collection descriptions with the rich text editor. You can add together links that direct customers to pages within your Shopify online store and to other websites. Yous tin can also add links that open email messages or make telephone calls, to help customers contact you lot.
Steps:
- Highlight the text or paradigm that y'all want to turn into a link.
-
Click Insert link.
-
Enter the destination URL for the link in the Link to field:
- To link to an external website that is outside of your Shopify store, enter
https://followed by the web address, for casehttps://www.instance.com. - To link to a page within your Shopify online shop, enter the brusque URL, for example
/collections/summer-collection. - To create a link that opens an email message, enter
mailto:followed past the email address, for examplemailto:example@case.com. - To create a link that makes a phone telephone call, enter
tel:, followed by the phone number, for exampletel:+0-123-456-7890.
- To link to an external website that is outside of your Shopify store, enter
-
Enter a brusk description of the link in the Link championship box.
-
Choose how the link will open up with the Open up this link in menu:
- the same window: The link will open up in a user's existing browser tab or window.
- a new window: The link will open in a new browser tab or window.
-
Click Insert link to convert your highlighted text into a link.
Add together internal and external links with the rich text editor
Links to pages inside your Shopify shop are chosen internal links. You tin can employ short URLs to create internal links. For case, the URL /collections will point to your store's collections page.
To link to a specific page of your online store, such every bit a drove or production folio, utilise the URL format /folio-type/page-handle. For example, to link to a drove you've created called Summertime Collection, use the URL /collections/summer-drove.
Links to websites that are outside of your Shopify shop are called external links. External links need to be entered in full and begin with http://.
Link to a file in page content
After y'all upload a file, you tin link it to content in the rich text editor to make information technology available for download from a product or collection description, webpage, or a blog mail service.
Steps:
- From your Shopify admin, go to Settings > Files.
- From the Shopify app, get to Store > Settings.
- Under Store settings, tap Files.
- From the Shopify app, go to Store > Settings.
- Nether Store settings, tap Files.
-
Copy the URL for the file that you lot want to link.
-
In your Shopify admin, click the product, collection, webpage, or blog mail service where y'all want to add together the file.
-
In the rich text editor, enter or choose link text.
-
Select the link text.
-
Click Insert link:
-
In the Link to field, paste the URL for the file that you want to link.
- Click Insert link. In the rich text editor, linked text displays in blue and is underlined.
Insert images with the rich text editor
There are 3 ways to insert an image using the rich text editor. You can:
- upload images
- choose from your product images
- apply a public image URL.
Upload images
Steps:
-
In the rich text editor, click the Insert image push button:

-
In the Insert prototype dialog, click the Uploaded images tab.
-
Click Upload file.
-
Cull a JPG or PNG image file from your reckoner.
-
Click the prototype that you uploaded to select it.
-
From the Size to insert menu, select the display size of the image. You can select Original to insert the image without altering its brandish size.
-
Click Insert image to place the image into the rich text editor.
Choose from product images
Steps:
-
In the rich text editor, click the Insert image button:
-
In the Insert image dialog, click the Product images tab.
-
Click the epitome that yous desire to insert.
If you don't see the product media that yous want to insert, then you tin can use the arrow buttons to look on different pages.
-
From the Size to insert menu, select the display size of the epitome. You tin can select Original to insert the image without altering its display size.
-
Click Insert image to identify the production epitome into the rich text editor.
Apply an image URL
To insert an paradigm using a public URL:
-
In the rich text editor, click the Insert image button:
-
In the Insert prototype dialog, click the URL tab.
-
Enter the publicly accessible URL of your epitome file.
-
Click Insert image to insert the image in the rich text editor at its original size.
Move and resize an prototype in the rich text editor
After you add an image into a product or collection description, webpage, or a blog, you tin can movement it to some other location in the content.
Steps:
-
In your Shopify admin, click the product, collection, webpage, or weblog postal service that includes the image that you want to movement or resize.
-
In the rich text editor, click the image.
-
Make your changes:
- To move the image, click and drag it to another location in the Content field.
- To resize the prototype, click and elevate one of the corners.
-
Click Save.
Edit an paradigm in the rich text editor
You tin can change the size, text wrapping, and alignment of an image within the rich text editor. You can also edit the image URL, or add or edit image alt text.
Steps:
- Double-click the image in the rich text editor to open the Edit epitome dialog.
- Use the size and alignment options to edit the epitome:
- To change the size of the image, select a size option.
- To change the image a new image URL.
- To improve your online shop's SEO and accessibility, add or edit image alt text.
- To add spacing, enter the number of pixels of infinite that you want on each side.
- To alter the alignment of the image, select from the icons representing left, center, or right alignment.
- To add text wrapping, check Wrap text around image.
- Click Edit paradigm to save your changes.
Insert videos with the rich text editor
You tin can insert or embed videos in blog posts, pages, production descriptions, and drove descriptions using the rich text editor.
If yous want to embed a video that you've created, then you outset need to upload it to a video streaming site such as YouTube or Vimeo.
YouTube does not permit you lot to disable related videos, but you can specify that the related videos should be from the same channel equally the video that only played.
Steps:
-
Copy the video'due south URL by pressing
ctrl+Con a PC orcontrol+Con a Mac. -
Visit Embed Responsively. Embed Responsively is a tool that will give you an improved embed code for your video.
-
On Embed Responsively, click to select the video website where your video is located.
-
Paste the video'south URL that you copied into the Folio URL box on Embed Responsively by pressing
ctrl+5on a PC orcommand+Fiveon a Mac. -
Click Embed. Embed Responsively will create the embed lawmaking for you.
-
If the video is from YouTube and y'all want to prove just related videos from the aforementioned YouTube channel, then discover the video'south URL in the embed lawmaking. Copy and paste
?rel=0at the end within the quotation marks:
-
Copy all of the code within the Embed lawmaking box.
-
In your Shopify admin, click the Insert video push in the rich text editor:

-
Paste the embed lawmaking into the box in the Insert video dialog.
-
Click Insert video.
-
Click Save when you are finished to relieve your changes to the item y'all were editing.
Insert audio files with the rich text editor
You tin can employ the rich text editor to insert or embed audio files in blog posts, pages, product descriptions, and collection descriptions.
Steps:
-
From your Shopify admin, click Settings, then click Files.
-
Click Upload files to upload the audio file y'all want to insert or embed in your store.
-
From the Online Store section, open the rich text editor for the folio or blog post yous want to feature the audio file.
-
Copy
<div id="role player"><audio controls="controls">, then paste the code in the rich text editor to embed an audio histrion on your page. -
Re-create the following code:
<source src="https://cdn.shopify.com/s/files/i/0220/2378/files/example.mp3" type="sound/mpeg" /></div>Paste this lawmaking in your rich text editor after the code for the audio player, and and then supersede
https://cdn.shopify.com/southward/files/1/0220/2378/files/example.mp3with the URL yous created for your audio file when yous uploaded information technology to Shopify. You can discover your audio file'southward URL at any fourth dimension on the Files folio. -
Click Save.
-
Click View to brand certain your sound file plays correctly.
Y'all tin utilize comment tags <!-- and --> for internal text that yous don't desire to publish to your shop.
Steps:
-
In your rich text editor, click the Show HTML button.
-
To add together an internal annotate, enclose the text that yous want to keep hidden within
<!--and-->. For example:<!--yourtext-->. -
Click Salvage.
HTML tags that are enclosed inside the comment tags are saved as internal text. For those HTML tags to work properly, you need to remove the comment tags <!-- and --> around them.

Source: https://help.shopify.com/en/manual/shopify-admin/productivity-tools/rich-text-editor
Posted by: baileythoseltogs.blogspot.com
0 Response to "Can You Edit A Streaming Sources Size By Changing The Url Gadget"
Post a Comment